![[CSS] 11_레이아웃 관련 스타일 2](https://img1.daumcdn.net/thumb/R750x0/?scode=mtistory2&fname=https%3A%2F%2Fblog.kakaocdn.net%2Fdn%2FcDdhcl%2FbtrMiPdYHK4%2FIVJK27yj8bPkW1BajAkxwK%2Fimg.png)
해당 차시 목표
CSS의 레이아웃 관련 스타일에 대해 알아보자
< 배치 관련 스타일>
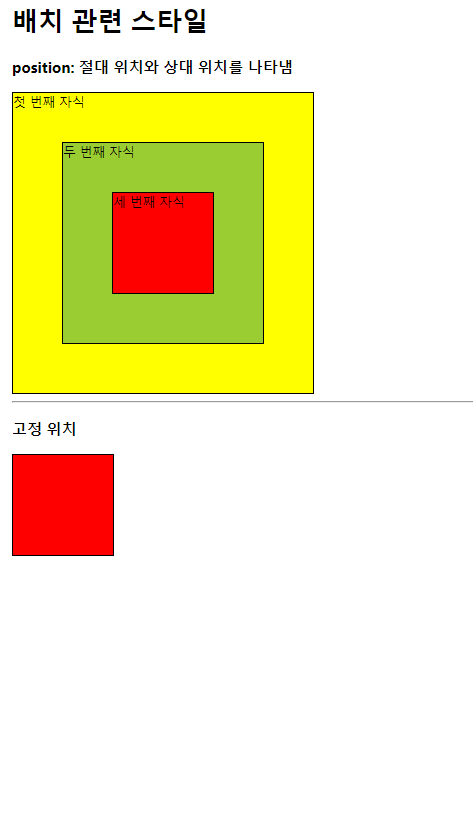
position: 절대 위치와 상대 위치를 나타냄
<style>
.outer {
border : 1px solid blue;
}
.positioning {
border : 1px solid black;
}
#first {
width : 300px;
height : 300px;
background-color: yellow;
}
#second {
width : 200px;
height : 200px;
background-color: yellowgreen;
}
#third {
width : 100px;
height : 100px;
background-color: red;
}
</style>
<body>
<!-- div.outer>div.positioning*3 + Enter -->
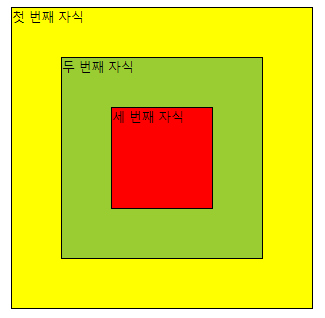
<div class="outer">
<div class="positioning" id="first">첫 번째 자식</div>
<div class="positioning" id="second">두 번째 자식</div>
<div class="positioning" id="third">세 번째 자식</div>
</div>
</body>
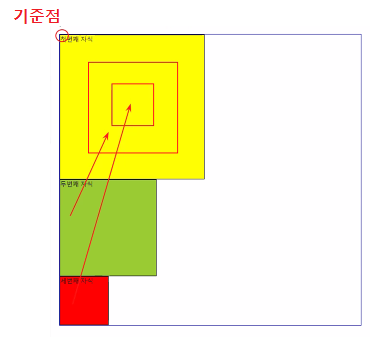
position : relative;
👉🏻 기준이 되는 요소(outer)에 기준점을 부여함
👉🏻 기준점을 잡지 않으면 자동으로 body에 잡혀 버림
position : absolute;
👉🏻 움직이고자 하는 요소 내에 position : absolute를 지정하여 절대적인 위치로 움직일 수 있게 함
top : 50px;
left : 50px;
👉🏻 부모 요소 (기준점 position : relative) 로부터 각각 위, 왼쪽으로부터 50px인 곳으로 옮겨 버리겠다
    <style>
        .outer {
            /* border : 1px solid blue; 부모 요소의 가이드 라인 잠깐 지우면 더 깔끔하게 과녁 모양 나옴 */
            position : relative;
            /* 기준이 되는 요소(outer)에 기준점을 부여함 */
            /* 만약 기준점을 바로 위의 부모 요소에 지정하지 않는다면
               기준점이 자동으로 body 태그에 잡혀 버림 */
        }

        .positioning {
            border : 1px solid black;
        }

        #first {
            width : 300px;
            height : 300px;
            background-color: yellow;
        }

        #second {
            width : 200px;
            height : 200px;
            background-color: yellowgreen;
            position : absolute;
            /* 움직이고자 하는 요소 내에 position : absolute를  지정하여 절대적인 위치로 움직일 수 있게 함*/
            top : 50px;
            left : 50px;
            /* 부모 요소 (기준점 position : relative) 로부터 각각 위, 왼쪽으로부터 50px인 곳으로 옮겨 버리겠다 */
        }

        #third {
            width : 100px;
            height : 100px;
            background-color: red;
            position : absolute;
            top : 100px;
            left : 100px;
        }
    </style>


<body>

    <!-- div.outer>div.positioning*3 + Enter -->
        <div class="outer">
        <div class="positioning" id="first">첫 번째 자식</div>
        <div class="positioning" id="second">두 번째 자식</div>
        <div class="positioning" id="third">세 번째 자식</div>
        </div>

</body>
고정 위치
 |
 |
| 스크롤을 올려도 | 스크롤을 내려도 사각형이 고정되어 있음 |
    <style>

        .fixed-area {
            width : 100px;
            height : 100px;
            background-color: red;
            position : fixed;
        }

    </style>


<body>

    <!-- background-attachment : fixed; 와 같은 이치 -->
    <div class="positioning fixed-area"></div>

</body>
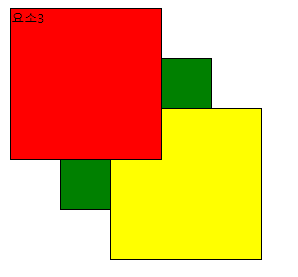
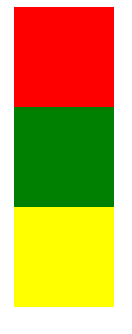
z-index
👉🏻 페이지 안의 요소들을 순서대로 위로 쌓는 속성
👉🏻 z-index의 숫자가 "높을수록" 다른 요소들보다 더 "위쪽"에 쌓여 있겠다라는 뜻
👉🏻 해당 속성의 값은 몇이 되는지 상관없이 단순히 상대적인 값의 크기만으로 위, 아래가 결정됨
    <style>

       .z-test {
            width : 150px;
            height : 150px;
            border : 1px solid black;
            position : absolute;
        }

        #z1 {
            background-color: yellow;
            top : 100px;
            left : 100px;
            z-index : 30;
        }

        #z2 {
            background-color: green;
            top : 50px;
            left : 50px;
            z-index : 10;
        }

        #z3 {
            background-color: red;
            z-index : 100;
        }

        /*
            z-index의 숫자가 "높을수록" 다른 요소들보다 더 "위쪽"에 쌓여 있겠다라는 뜻
            해당 속성의 값은 몇이 되는지 상관없이 단순히 상대적인 값의 크기만으로 위, 아래가 결정됨
        */

    </style>


<body>

    	<!-- div.outer>div#z$.z-test{요소$}*3 + Enter -->
        <div class="outer">
        <div id="z1" class="z-test">요소1</div>
        <div id="z2" class="z-test">요소2</div>
        <div id="z3" class="z-test">요소3</div>
    	</div>

</body>
visibility
👉🏻 페이지에 특정 요소를 보이거나 보이지 않게 숨겨 주는 속성
 |
 |
 |
 |
|
기존
|
visibility : hidden;
요소가 안 보이게끔 숨기지만 공간은 차지함! |
display : none; 요소가 안 보이게끔 숨기면서 공간도 차지하지 않음 |
display : block; 다시 보여 주고 싶다면? 기존 값을 다시 주면 됨 |
<style>
.vis-test {
width : 100px;
height : 100px;
}
#vis {
/* visibility : hidden; */
/* 요소가 안 보이게끔 숨기지만 공간은 차지함!
그래서 아래의 방법을 더 많이 씀 */
display : none;
/* 요소가 안 보이게끔 숨기면서 공간도 차지하지 않음 */
/* 숨긴 것을 다시 보여 주고 싶다면? 기존 값을 다시 주면 됨 */
display : block;
}
</style>
<body>
<!-- div.vis-text*3 + Enter -->
<div class="vis-test" style="background-color : red;"></div>
<div id="vis" class="vis-test" style="background-color : green;"></div>
<div class="vis-test" style="background-color : yellow;"></div>
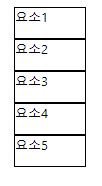
</body>float
👉🏻 페이지 내의 요소들을 화면으로부터 띄워서 왼쪽 또는 오른쪽으로 배치하는 속성
 |
 |
 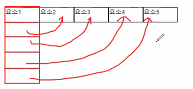 |
| 속성 부여 전 | float : right; 위부터 오른쪽으로 감 |
float : left; 위부터 왼쪽으로 감 |
    <style>

        .float-test {
            border : 1px solid black;
            width : 70px;
            height : 30px;
            float : left;
        }

    </style>


<body>

    <!-- div.float-test{요소$}*5 + Enter -->
    <div class="float-test">요소1</div>
    <div class="float-test">요소2</div>
    <div class="float-test">요소3</div>
    <div class="float-test">요소4</div>
    <div class="float-test">요소5</div>

    <br clear="both"> <!-- float 속성을 해제할 때 사용 -->
    <hr>

</body>
*참고!
float 속성 사용 후 뒤에 코드를 기술할 때 <br>을 해 주기 싫다면?
    <br clear="both"> <!-- float 속성을 해제할 때 사용 -->
    <hr>
👉🏻 화면에서 띄워서 배치하는 float는 body 태그 기준으로 해당 코드가 달라붙어 있지 않기 때문에
그 뒤에 코드를 작성할 때는 <br> 태그 여러 개로 공간을 만들어 줘야 함
👉🏻 하지만! float 속성은 똑똑해서 해당 속성을 해제하는 코드가 있는데 그게 바로
<br clear="both"> 태그!
 |
 |
| <br clear="both"> 태그를 쓰지 않았을 때 <hr> 구분선의 위치 |
<br clear="both"> 태그를 썼을 때 <hr> 구분선의 위치 |