![[JavaScript] 03_요소 가져오기(접근하기)](https://img1.daumcdn.net/thumb/R750x0/?scode=mtistory2&fname=https%3A%2F%2Fblog.kakaocdn.net%2Fdn%2FeVy05n%2FbtrMMaoypaT%2FLPvZOHQP6G7QTS3vJ06tU0%2Fimg.png)
더보기
JavaScript의 요소 가져오기(접근하기)에 대해 알아보자
자바스크립트의 요소는 CSS의 선택자와 같은 의미
✔️ CSS의 기본 선택자들
모든(전체) 선택자: 모든 태그들을 다 선택하겠음 (*)
아이디 선택자: 해당 아이디값으로 선택하겠음 (#아이디명)
태그 선택자: 해당 태그들은 다 선택하겠음 (태그명)
클래스 선택자: 해당 클래스값으로 선택하겠음 (.클래스명)
HTML 요소에 접근하기 (해당 요소 객체 가져오기)
1. getElementById("아이디명")
👉🏻 아이디로 접근하기
아이디는 중복될 수 없으므로 가져와 봤자 1개임
<head>
<style>
/* 실습을 위해 눈에 띄게 스타일 줌 */
.area {
border : 1px solid black;
width : 300px;
height : 100px;
}
</style>
</head>
<h3>1) 아이디로 접근하기</h3>
<div id="area1" class="area"></div>
<button onclick="accessId();">아이디로 접근</button>
<script>
function accessId() {
// 아이디로 요소에 접근할 때
// document.getElementById("아이디명");
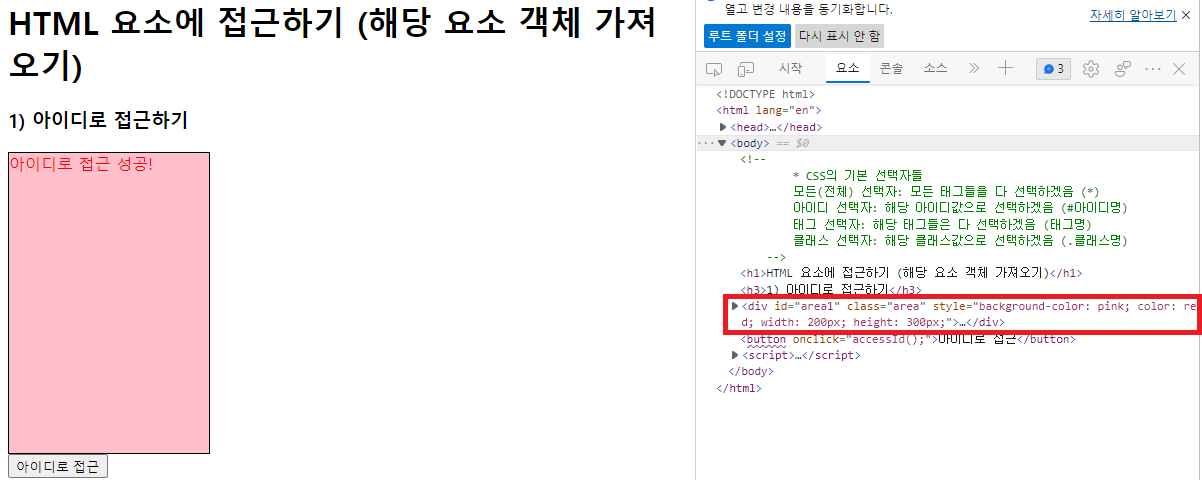
var area1 = document.getElementById("area1");
console.log(area1);
console.dir(area1);
// 선택된 요소의 속성들에 접근해서 값을 가져온다거나 변경 가능
// 속성에 접근하고자 한다면 => 선택된요소.접근하고자하는속성명
area1.innerHTML += "아이디로 접근 성공! <br>";
// 선택된 요소에 스타일 변경
area1.style.backgroundColor = "pink";
area1.style.color = "red";
area1.style.width = "200px";
area1.style.height = "300px";
// 개발자 도구로 확인 시 인라인 방식으로 스타일이 부여된 것을 확인할 수 있음
}
</script>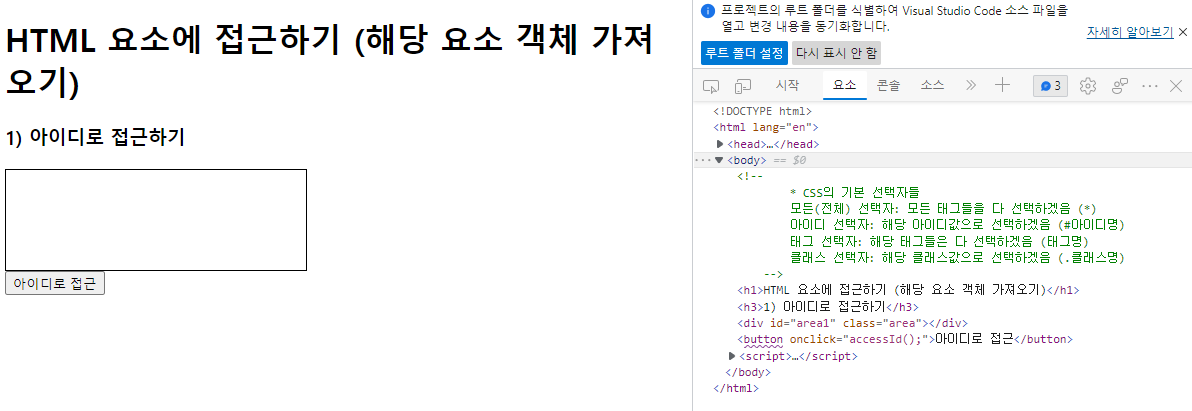
<head>
<style>
/* 실습을 위해 눈에 띄게 스타일 줌 */
.area {
border : 1px solid black;
width : 300px;
height : 100px;
}
</style>
</head>
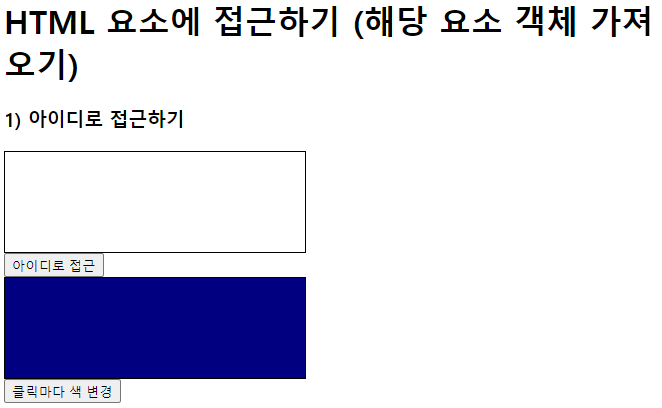
<div id="area2" class="area" style="background-color : red;"></div>
<button onclick="accessId2();">클릭마다 색 변경</button>
<script>
function accessId2() {
var area2 = document.getElementById("area2");
// console.log(area2.style.backgroundColor); // red
/*
if(area2.style.backgroundColor == "red") {
area2.style.backgroundColor = "orange";
} else if(area2.style.backgroundColor == "orange") {
area2.style.backgroundColor = "yellow";
} else if(area2.style.backgroundColor == "yellow") {
area2.style.backgroundColor = "green";
} else if(area2.style.backgroundColor == "green") {
area2.style.backgroundColor = "blue";
} else if(area2.style.backgroundColor == "blue") {
area2.style.backgroundColor = "navy";
} else if(area2.style.backgroundColor == "navy") {
area2.style.backgroundColor = "purple";
} else {
area2.style.backgroundColor = "red";
}
*/
// switch 구문으로도 작성 가능 (자바와 문법은 동일)
switch(area2.style.backgroundColor) {
case "red" : area2.style.backgroundColor = "orange"; break;
case "orange" : area2.style.backgroundColor = "yellow"; break;
case "yellow" : area2.style.backgroundColor = "green"; break;
case "green" : area2.style.backgroundColor = "blue"; break;
case "blue" : area2.style.backgroundColor = "navy"; break;
case "navy" : area2.style.backgroundColor = "purple"; break;
default : area2.style.backgroundColor = "red";
}
}
</script>
2. getElementsByTagName("태그명")
👉🏻 태그명으로 접근하기
여러 개가 가지고 와질 수 있으므로 배열 형식으로 가져와야 함(+ 반복문 활용 가능)
(단! 1개만 뽑아내더라도 해당 값이 배열에 담김을 주의할 것)
   <h3>2) 태그명으로 접근하기</h3>

    <!-- ul>li{목록$}*5 + Enter -->
    <ul>
        <li>목록1</li>
        <li>목록2</li>
        <li>목록3</li>
        <li>목록4</li>
        <li>목록5</li>
    </ul>

    <button onclick="accessTagName();">태그명으로 접근</button>

    <script>
        function accessTagName() {

            // 태그명으로 요소에 접근
            // document.getElementByTagName("태그명");
            // => 선택된 여러 개의 요소 객체들이 배열에 담겨서 반환
            //    (자바스크립트에서의 배열의 []로 표현)
            // 자바스크립트의 배열 == 자바의 ArrayList
            // => 다른 자료형 입력 가능, 크기 미리 지정 안 해도 됨
            // var list = document.getElementByTagName("ul"); // [ul] 하나만 선택되더라도 배열로 반환
            var list = document.getElementsByTagName("li"); // [li, li, li, ...]

            console.log(list);
            console.log("배열의 크기(선택된 li의 개수): " + list.length);
            console.log("이 배열의 마지막 인덱스: " + (list.length - 1));

            // list[0].innerHTML = "안녕하세요";
            // list[0].innerHTML = "안녕하세요";

            var blueColor = 50; // 그라데이션을 위해 변수 선언

            // 반복문 활용 가능
            for(var i = 0; i < list.length; i++) {
                list[i].innerHTML = "안녕하세요" + (i + 1);
                // list[i].style.backgroundColor = "rgb(130, 220, 50)"; // 같은 색상
                list[i].style.backgroundColor = "rgb(130, 220, " + blueColor + ")";
                blueColor += 50;
            }
        }
    </script>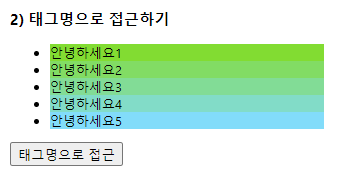
3. getElementsByClassName("클래스명")
👉🏻 클래스명으로 접근하기
클래스명 중복 가능하므로 여러 값을 가지고 올 수 있으므로 배열 형식
(단! 1개만 뽑아내더라도 해당 값이 배열에 담김을 주의할 것)
    <h3>3) 클래스명으로 접근하기</h3>

    <div class="test">안녕하세요</div>
    <p class="test">반갑습니다</p>
    <ul class="test">
        <li>hi</li>
        <li>bye</li>
    </ul>
    <pre class="test test1">안녕히 가세요</pre>

    <button onclick="accessClass();">클래스명으로 접근</button>

    <script>
        function accessClass() {

            // class 속성으로 요소를 가져올 때
            // document.getElementsByClassName();
            // => 선택된 요소 객체들이 배열에 담겨서 반환
            var arr = document.getElementsByClassName("test");

            console.log(arr);
            console.log(arr.length); // 4

            for(var i = 0; i < arr.length; i++) {
                arr[i].style.color = "blue";
            }

            var test1 = document.getElementsByClassName("test1");

            console.log(test1);
            console.log(test1.length); // 1

            // test1.style.backgroundColor // 로는 스타일 부여할 수 없음! -> 배열에 담았기 때문
            test1[0].style.backgroundColor = "yellow";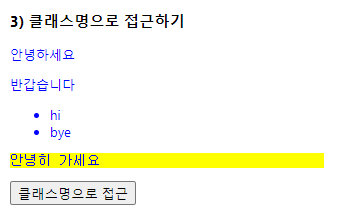
👉🏻 주의사항
태그명으로 접근하든 클래스명으로 접근하든 간에
아무리 한 개의 요소만 선택이 되더라도 배열로 담겨서 리턴(반환)됨!
=> 단 한 개의 요소만 선택이 되었을 경우에도 해당 배열의 0번째 인덱스에 담겨서 반환
4. getElementsByName("name이름")
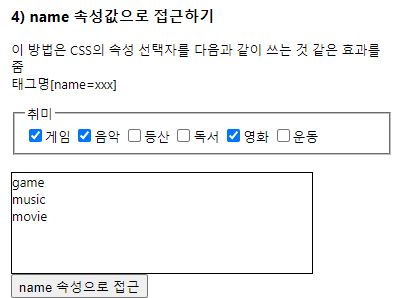
👉🏻 name 속성값으로 접근하기
    <h3>4) name 속성값으로 접근하기</h3>
    <p>
        이 방법은 CSS의 속성 선택자를 다음과 같이 쓰는 것 같은 효과를 줌 <br>
        태그명[name=xxx]
    </p>

    <form action="test.do" method="get">
        <fieldset>
            <legend>취미</legend>

            <!--(input[type=checkbox name=hobby value= id=]+label)*6 + Enter -->
            <input type="checkbox" name="hobby" value="game" id="game"><label for="game">게임</label>
            <input type="checkbox" name="hobby" value="music" id="music"><label for="music">음악</label>
            <input type="checkbox" name="hobby" value="hiking" id="hiking"><label for="hiking">등산</label>
            <input type="checkbox" name="hobby" value="book" id="book"><label for="book">독서</label>
            <input type="checkbox" name="hobby" value="movie" id="movie"><label for="movie">영화</label>
            <input type="checkbox" name="hobby" value="sport" id="sport"><label for="sport">운동</label>
        </fieldset>
    </form>

    <br>

    <div id="area3" class="area"></div>
    <button onclick="accessName();">name 속성으로 접근</button>

    <script>
        function accessName() {

            // name 속성값으로 요소를 가져올 때
            // document.getElementsByName("name속성값");
            // => 선택된 요소 객체들이 배열에 담겨서 반환
            var hobby = document.getElementsByName("hobby"); // [checkbox, checkbox, ...]

            // console.log(hobby);
            // console.log(hobby.length);

            var checkedItem = "";
            // for(var i = 0; i < hobby.length; i++) { 일반 for문
            for(var i in hobby) { // for in 문 (foreach 문이랑은 다름!)
                                  // 앞쪽의 변수에 값이 담기는 개념이 아니라 인덱스에 차곡차곡 담기는 개념임!
                // console.log(hobby[i].checked);
                // checkbox의 checked 속성에 직접적으로 접근하면
                // 만일 해당 체크박스가 체크된 상태라면 true / 아니라면 false 값이 들어 있음
                if(hobby[i].checked) { // 만약 체크되었다면
                    checkedItem += hobby[i].value + "<br>";
                }
            }

            // console.log(checkedItem); // game<br>music<br>book<br>movie<br> 문자열로 나옴

            // var divEl = document.getElementById("area3");
            // 아이디로 끌고 올 때는 Element"s"가 아님!!!
            // divEl.innerHTML = checkedItem;

            // 이렇게 한 줄로 줄일 수도 있음
            document.getElementById("area3").innerHTML = checkedItem;
        }
    </script>