![[업데이트 설정값] 티스토리 스킨에 문제가 생겨 덮어 씌웠다면](https://img1.daumcdn.net/thumb/R750x0/?scode=mtistory2&fname=https%3A%2F%2Fblog.kakaocdn.net%2Fdn%2FbfJpms%2FbtrQeNi7X3i%2F6M5vRJ0yNjkMxnfEBQQKXk%2Fimg.png)
1. 소스코드 복사 버튼
위 .js를 파일 업로드에 업로드 후
1-1. 코드 블럭 복사 html의 </head> 바로 위에 추가
<script src="//t1.daumcdn.net/tistory_admin/lib/jquery/jquery-1.12.4.min.js"></script>
<script type="text/javascript" src="./images/clipboard.min.js"></script>
1-2. html </body> 영역 끝나기 바로 전에 추가
    <!-- (내가 추가함) 코드 블럭 복사 관련 코드 시작 -->
    <script>

      $(document).ready(function () {
      $('pre[id^="code"]').each(function (index, e) {
      let button = document.createElement('button');
      button.innerText = "Copy";
      button.className = 'copy-button';
      button.style.cursor = 'pointer';
      button.setAttribute('data-clipboard-text', e.innerText);
      button.addEventListener('mouseleave', function(event) {
      event.currentTarget.setAttribute('class', 'copy-button');
      event.currentTarget.removeAttribute('copy-message');
      });
      e.appendChild(button);
      });

      var clipboard = new ClipboardJS('.copy-button');
      clipboard.on('success', function (e) {
        e.clearSelection();
      e.trigger.setAttribute('class', 'copy-button copy-message');
      e.trigger.setAttribute('copy-message', '복사완료!');
      });
      });

    </script>
    <!-- (내가 추가함) 코드 블럭 복사 관련 코드 끝 -->
1-3. 코드블럭 복사 css 제일 하단에 추가
pre {
	position: relative;
	overflow: visible;
}
pre .copy-button {
	opacity: 0;
	position: absolute;
	right: 4px;
	top: 2px;
	padding: 2px 6px;
	color: #aaa;
	background: rgba(0,0,0,.6);
	border-radius: 5px;
	transition: opacity .3s ease-in-out;
}
pre:hover .copy-button {
	opacity: 1;
}
pre .copy-button:hover {
	color: #eee;
	transition: all ease-in-out 0.3s;
}
pre .copy-button:active {
	color: #33f;
	transition: all ease-in-out 0.1s;
}
.copy-message:before {
	content: attr(copy-message);
	position: absolute;
	left: -85px;
	top: 0px;
	padding: 2px 6px;
	color: #fff;
	background: rgba(0,0,0,.6);
	border-radius: 5px;
}
2. 사이드바 (글쓰기, 노래링크, 깃허브 링크)
링크 추가 후 사이드 바 관련 .png도 파일 업로드에 추가


<!-- 프로필-->
  <div class="profile"><img class="thumbnail lazyload" data-src="https://tistory1.daumcdn.net/tistory/5389287/attach/640f86ab708845429a63896dbfd83c4d" data-sizes="auto" width="100" height="100" alt="천재강쥐">
    <div class="title"><a href="https://justkeeptyping.tistory.com/">뇨내는 샤라웃</a></div>
    <div class="blogger"><a href="https://justkeeptyping.tistory.com/manage">천재강쥐</a></div>
  </div>
</s_sidebar_element>
<s_sidebar_element>
  <!-- (내가 추가함) 새 글 쓰기, 깃허브, 관리 메뉴 바로가기 시작 -->
  <div class="shortcut">
    <table>
      <tr>
        <td>
          <a href="https://justkeeptyping.tistory.com/manage/newpost" target="_blank">
          <img src="./images/write.png" width="60%" height="60%"></i></a>
        </td>
        <td>
          <a href="https://www.youtube.com/watch?v=1yylwX-tTh4" target="_blank">
          <img src="./images/meandru.png" width="60%" height="60%"></i></a>
        </td>
        <td>
          <a href="https://github.com/soma-kim" target="_blank">
          <img src="./images/github.png" width="60%" height="60%"></i></a>
        </td>
      </tr>
    </table>
  </div>
  <!-- (내가 추가함) 새 글 쓰기, 깃허브, 관리 메뉴 바로가기 끝 -->
3. 그래그 금지 코드
2. 드래그 금지 html의 body 영역 <body> 태그 시작 후에 바로 추가

  <!-- 내가 추가한 드래그 금지 시작 -->
  <body oncontextmenu="return false" onselectstart="return false" ondragstart="return false">
    <!-- 내가 추가한 드래그 금지 끝 -->
4. 기타 설정
1. 최상단 /*[업데이트 설정값] 티스토리 스킨에 문제가 생겨 덮어 씌웠다면*/만 남기기
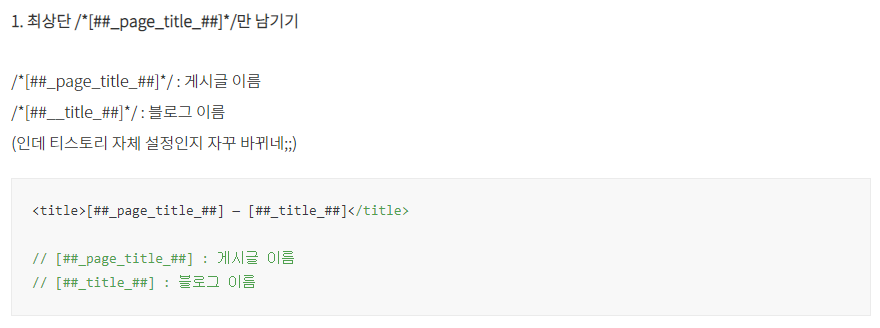
/*[업데이트 설정값] 티스토리 스킨에 문제가 생겨 덮어 씌웠다면*/ : 게시글 이름
/**/ : 블로그 이름
(인데 티스토리 자체 설정인지 자꾸 바뀌네;;)
<title>[업데이트 설정값] 티스토리 스킨에 문제가 생겨 덮어 씌웠다면 — 뇨내는 샤라웃</title>

// [업데이트 설정값] 티스토리 스킨에 문제가 생겨 덮어 씌웠다면 : 게시글 이름
// 뇨내는 샤라웃 : 블로그 이름
2. 글 읽기 목록 - 지그재그
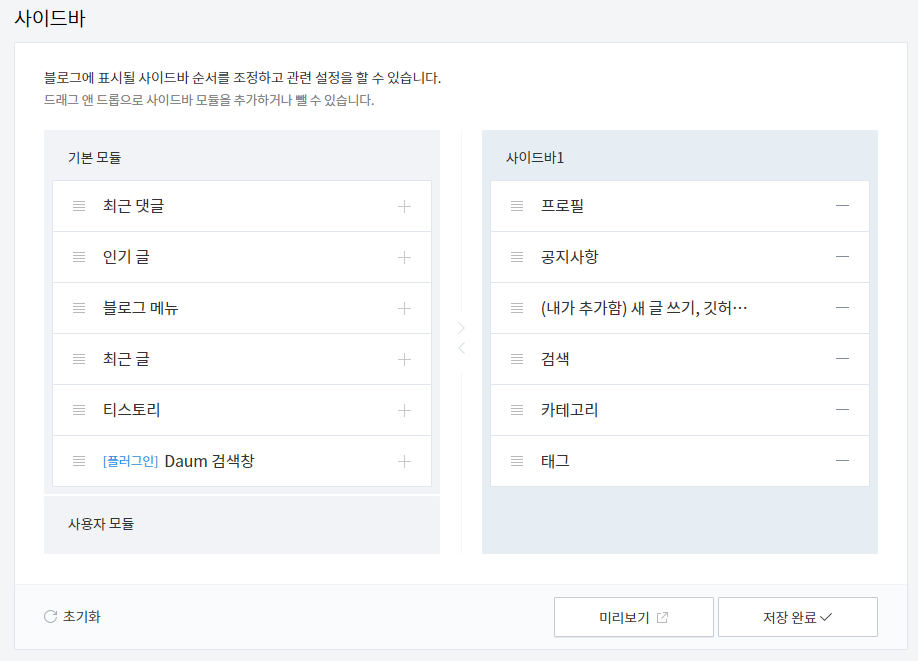
3. 사이드바 - 프로필, 공지사항(있을때만) 내메뉴바, 검색, 카테고리,태그