![[Spring] Alert창 꾸미기 - AlertifyJS](https://img1.daumcdn.net/thumb/R750x0/?scode=mtistory2&fname=https%3A%2F%2Fblog.kakaocdn.net%2Fdn%2FcOTrqT%2FbtrRDYc3as6%2F4Xtwe7ke13baWdaNNbJ8a0%2Fimg.png)
<Alert창을 예쁘게 꾸미는 법>
1. https://alertifyjs.com/ 접속
AlertifyJS
All of AlertifyJS animation/transition effects are disabled due to user preference that the system minimizes the amount of animation or motion it uses. See prefers-reduced-motion CSS media feature.
alertifyjs.com
2. AlertigyJS를 정의하기 위해 Getting Started 접속 후 CDN 코드 head 영역에 붙여 넣기
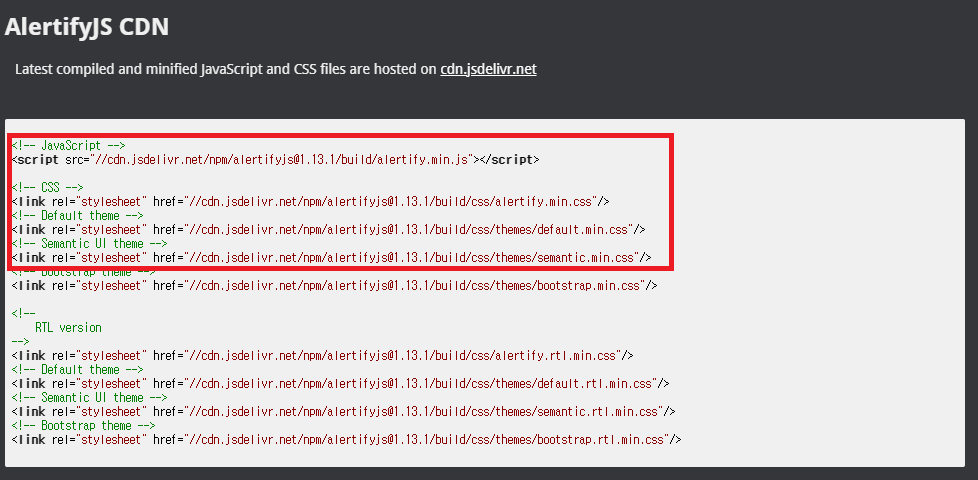
💻 예시 코드
(나의 경우, 부트스트랩 코드는 기존에 붙여 넣은 게 있기 때문에 넣지 않았음! 기존 코드에 없다면 함께 붙여 넣을 것)
    <!-- Alertify 라이브러리 -->
    <!-- JavaScript -->
	<script src="//cdn.jsdelivr.net/npm/alertifyjs@1.13.1/build/alertify.min.js"></script>
	<!-- CSS -->
	<link rel="stylesheet" href="//cdn.jsdelivr.net/npm/alertifyjs@1.13.1/build/css/alertify.min.css"/>
	<!-- Default theme -->
	<link rel="stylesheet" href="//cdn.jsdelivr.net/npm/alertifyjs@1.13.1/build/css/themes/default.min.css"/>
	<!-- Semantic UI theme -->
	<link rel="stylesheet" href="//cdn.jsdelivr.net/npm/alertifyjs@1.13.1/build/css/themes/semantic.min.css"/>

    <!-- Bootstrap theme -->
	<link rel="stylesheet" href="//cdn.jsdelivr.net/npm/alertifyjs@1.13.1/build/css/themes/bootstrap.min.css"/>
3. 모달창을 꾸미기 위해 Components 메뉴 탭에서 내가 원하는 모달창 클릭
(나의 경우, alert창이 필요해 Alert 선택함)

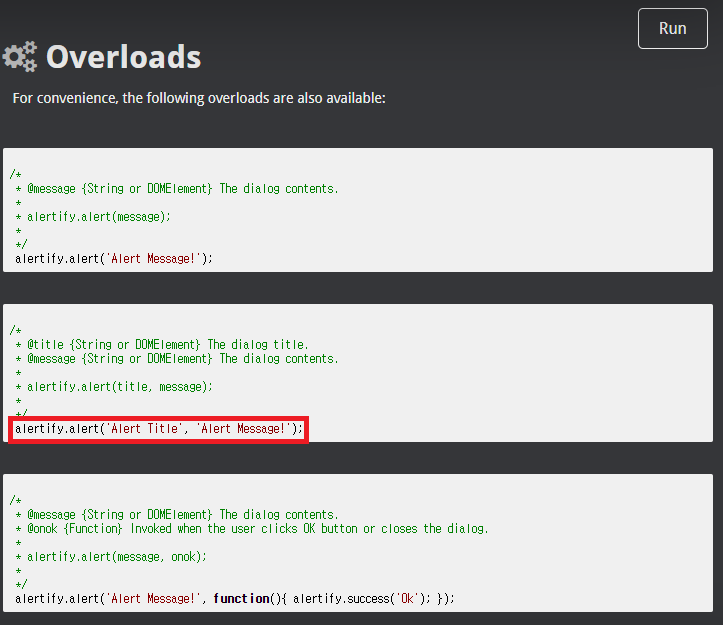
4. 내가 원하는 방식을 Overloads에서 선택
(나의 경우, 제목과 내용을 넣고자 했기에 2번째 alert창의 코드를 선택함)
💻 예시 코드
(나의 경우, header.jsp의 로그인 alert을 바꾸어 보았음)
	<!-- 액션 태그의 특징: script 태그 영역 내부에서 사용할 수 없음 (인식 안 됨) -->
	<c:if test="${ not empty alertMsg }">
		<script>
			// alert("${ alertMsg }");
			alertify.alert("서비스 성공", "${ alertMsg }");
		</script>
		<c:remove var="alertMsg" scope="session" />
	</c:if>
5. 결과 화면 확인

