![[Spring] Spring 웹 사이트 만들기 7 - 게시판(게시글 작성/상세 조회)](https://img1.daumcdn.net/thumb/R750x0/?scode=mtistory2&fname=https%3A%2F%2Fblog.kakaocdn.net%2Fdn%2F1R9AZ%2FbtrRH7HEAEn%2FoAZkLWbVgojkViT4JRB3N0%2Fimg.png)
🔥 게시글 작성 - 1개의 첨부파일 업로드🔥
* 만약 다중파일 업로드를 구현하고 싶다면?
👉🏻 jsp 에서 여러 개의 input type="file" 요소에 모두 동일한 name 속성을 부여 (ex. upfile)
👉🏻 Controller의 메소드에서 MultipartFile[] upfile 또는 List<MultipartFile> upfile로 받으면 됨!
💻 .jsp
<input type="file" name="upfile">
<input type="file" name="upfile">
<input type="file" name="upfile">
💻 Controller
~~(MultipartFile[] upfile) {
~~(List<MultipartFile> upfile) {
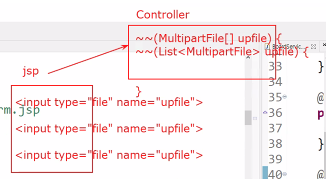
👉🏻 0번째 인덱스에서부터 차곡차곡 첨부파일의 정보들이 담겨 있음 : 반복문 활용 가능
👉🏻 이런 식으로 진행한다면 Attachment 클래스, 테이블을 따로 빼야 함!
💻 boardEnrollForm.jsp 생성
👉🏻 폼에서 head 영역 content, .innerOuter, 스트립트, 링크 제외 후 head, body 코드 가지고 오기
👉🏻 링크와 스크립트의 경우 include 할 header에 적용되어 있기 때문에 중복 적용 할 필요 없어서 뺌!
👉🏻 작성자란에 하드코딩되어 있던 user01을 로그인한 사용자의 아이디로 보이도록 ${ loginUser.userId }로 수정
👉🏻 form action 속성에 insert.bo 링크 걸기
👉🏻 Controller에서 Board b로 받을 예정이므로 필드명으로 name 속성 맞춰 주기
👉🏻 첨부파일 관련 사항이 있으므로 form 태그 내 enctype="multipart/form-data"
<%@ page language="java" contentType="text/html; charset=UTF-8"
    pageEncoding="UTF-8"%>
<%@ taglib prefix="c" uri="http://java.sun.com/jsp/jstl/core" %>
<!DOCTYPE html>
<html>
<head>
    <meta charset="UTF-8">
    <title>Document</title>
    <style>
        #enrollForm>table {width:100%;}
        #enrollForm>table * {margin:5px;}
    </style>
</head>

    <jsp:include page="../common/header.jsp" />

    <div class="content">
        <br><br>
        <div class="innerOuter">
            <h2>게시글 작성하기</h2>
            <br>

            <form id="enrollForm" method="post" action="insert.bo" enctype="multipart/form-data">
                <table algin="center">
                    <tr>
                        <th><label for="title">제목</label></th>
                        <td><input type="text" id="title" class="form-control" name="boardTitle" required></td>
                    </tr>
                    <tr>
                        <th><label for="writer">작성자</label></th>
                        <td><input type="text" id="writer" class="form-control" value="${ loginUser.userId }" name="boardWriter" readonly></td>
                    </tr>
                    <tr>
                        <th><label for="upfile">첨부파일</label></th>
                        <td><input type="file" id="upfile" class="form-control-file border" name="upfile"></td>
                    </tr>
                    <tr>
                        <th><label for="content">내용</label></th>
                        <td><textarea id="content" class="form-control" rows="10" style="resize:none;" name="boardContent" required></textarea></td>
                    </tr>
                </table>
                <br>

                <div align="center">
                    <button type="submit" class="btn btn-primary">등록하기</button>
                    <button type="reset" class="btn btn-danger">취소하기</button>
                </div>
            </form>
        </div>
        <br><br>

    </div>

    <jsp:include page="../common/footer.jsp" />

</body>
</html>
⌨️ BoardController
👉🏻 Spring에서는 첨부파일 관련된 MultipartRequst를 뽑아낼 필요 없이 MultipartFile을 매개변수로 넣어 주기만 하면 됨!
👉🏻 하지만, 매개변수로만 받은 뒤에는 첨부파일 관련 내용이 null로 나옴!
	@RequestMapping("insert.bo")
	public void insertBoard(Board b, MultipartFile upfile) {

		System.out.println(b);
		System.out.println(upfile);

		// MultipartFile: 첨부파일을 선택했든 안 했든 생성된 객체 (즉, null이 아님)
		//                다만, filename 필드에 원본명이 있냐 없냐의 차이로 첨부파일이 있는지 없는지 확인 가능함

	}
📖 스프링에서 파일을 업로드(첨부파일) 하기 위한 라이브러리 2가지
👉🏻 하단의 pom.xml, root-context.xml 코드 흐름 참고용
💻 pom.xml
👉🏻 파일 업로드 관련 두 개의 라이브러리를 dependency로 추가함
		<!-- 4. 파일 업로드 관련 두 개의 라이브러리 -->
		<dependency>
		    <groupId>commons-fileupload</groupId>
		    <artifactId>commons-fileupload</artifactId>
		    <version>1.4</version>
		</dependency>

		<dependency>
    		<groupId>commons-io</groupId>
		    <artifactId>commons-io</artifactId>
		    <version>2.11.0</version>
		</dependency>
💻 root-context.xml
	<!-- 파일 업로드 관련 빈 등록 -->
	<bean class="org.springframework.web.multipart.commons.CommonsMultipartResolver" id="multipartResolver">

		<!-- defaultEncoding: 업로드되는 파일에 대한 인코딩 처리를 어떻게 할 건지를 지정 -->
		<property name="defaultEncoding" value="UTF-8" />

		<!--
			maxUploadSize: 한 번에 업로드되는 파일의 총 용량

			- 총 파일의 최대 용량은 10MByte로 지정
			  10MByte == 10 * 1024 * 1024 Byte
			  단, xml에서는 계산식이 적용되지 않으므로 직접 계산한 결과를 넣어야 함
			  계산 결과 == 10,485,760 => 대략 10,000,000
		-->

		<property name="maxUploadSize" value="10000000" />
		<!-- 자바에서는 value="10 * 1024 * 1024"이 자동으로 계산됐지만 스프링에서는 계산된 결과값을 넣어 줘야 함!  -->

		<!--  maxInMemorySize: 메모리상의 파일 최대 용량, 하나의 파일 최대 용량이 10000000Byte 값으로 지정됨 -->
		<property name="maxInMemorySize" value="10000000" />

	</bean>
⌨️ BoardController
👉🏻 6. 업로드 하고자 하는 서버의 물리적인 실제 경로 알아내기에 대한 폴더 위치 확인

👉🏻 파일명 수정 작업 후 서버에 업로드 시키는 과정은 매번 같은 코드가 반복되기 때문에 일반 메소드로 빼 놓기!
👉🏻 Spring의 Controller 메소드가 반드시 요청을 처리하는 메소드로 이루어져야 하는 건 아니므로 따로 빼 놓아도 아무 상관없음!
👉🏻 saveFile 메소드에서는 문자열 타입을 넘겨야 하기 때문에 반환형 String, return 구문 주의!
	@RequestMapping("insert.bo")
	public void insertBoard(Board b, MultipartFile upfile, HttpSession session, ModelAndView mv) {

		// System.out.println(b);
		// System.out.println(upfile);

		// 요청 시 name 속성과 필드명을 정확하게 맞췄음에도 불구하고 제대로 된 전달값이 안 들어옴
		// 요청 시 분명히 파일을 넘겼음에도 불구하고 upfile 값이 null
		// => 파일 업로드에 필요한 Spring 라이브러리를 pom.xml에 추가하지 않았기 때문
		// 파일 업로드용 라이브러리: commons-fileupload, commons-io

		// MultipartFile: 첨부파일을 선택했든 안 했든 생성된 객체 (즉, null이 아님)
		//                다만, filename 필드에 원본명이 있냐 없냐의 차이로 첨부파일이 있는지 없는지 확인 가능함

		// 전달된 파일이 있을 경우 => 파일명 수정 작업 후 서버로 업로드
		// => 원본명, 서버에 업로드된 경로를 이어 붙이기
		if(!upfile.getOriginalFilename().contentEquals("")) {
			/*
			// 파일명 수정 작업 후 서버에 업로드시키기
			// 예) "flower.png" => "2022112210405012345.png"
			// 1. 원본파일명 뽑아오기
			String originName = upfile.getOriginalFilename(); // "flower.png"

			// 2. 시간 형식을 문자열로 뽑아내기
			String currentTime = new SimpleDateFormat("yyyyMMddHHmmss").format(new Date()); // "2022112210405012345.png"

			// 3. 뒤에 붙을 5자리 랜덤값 뽑기
			int ranNum = (int)(Math.random() * 90000) + 10000; // 5자리 랜덤값

			// 4. 원본 파일로부터 확장자만 뽑기
			// String ext = originName.substring(마지막 .의위치);
			String ext = originName.substring(originName.lastIndexOf(".")); // ".png"

			// 5. 모두 이어 붙이기
			String changeName = currentTime + ranNum + ext;

			// 6. 업로드 하고자 하는 서버의 물리적인 실제 경로 알아내기
			String savePath = session.getServletContext().getRealPath("/resources/uploadFiles/");

			// 7. 경로와 수정 파일명을 합체 후 파일을 업로드 해 주기
			try {
				upfile.transferTo(new File(savePath + changeName)); // File의 매개변수로 경로를 지정해 주면 File이 만들어지면서 경로로 들어감
			} catch (IllegalStateException | IOException e) {
				e.printStackTrace();
			}
			*/

			String changeName = saveFile(upfile, session);

			// 8. 원본명, 서버에 업로드된 수정명을 Board b에 담기
			// => boardTitle, boardContent, boardWriter 필드에만 담겨 있음
			// => originName, changeName 필드에도 전달된 파일에 대한 정보를 담을 것임!
			b.setOriginName(upfile.getOriginalFilename());
			b.setChangeName("resources/uploadFiles/" + changeName); // 실제 경로도 같이 이어붙일 것(FILE_PATH 컬럼을 따로 빼두지 않음)

		}

		// 넘어온 첨부파일이 있을 경우 b: 제목, 작성자, 내용, 원본파일명, 경로 + 수정파일명
		// 넘어온 첨부파일이 없을 경우 b: 제목, 작성자, 내용
		int result = boardService.insertBoard(b);

		if(result > 0) { // 성공 => 게시글 리스트 페이지로 url 재요청(list.bo)

			session.setAttribute("alertMsg", "성공적으로 게시글이 등록되었습니다.");
			mv.setViewName("redirect:/list.bo");

		} else { // 실패 => 에러페이지로 포워딩

			// mv.addObject("errorMsg", "게시글 작성 실패");
			// mv.setViewName("common/errorPage");

			// addObject 메소드의 반환형은 ModelAndView 타입임
			// => 다음과 같이 메소드 체이닝 가능함
			mv.addObject("errorMsg", "게시글 작성 실패").setViewName("common/errorPage");
		}

	}

	// 현재 넘어온 첨부파일 그 자체를 수정명으로 서버의 폴더에 저장시키는 메소드 (일반 메소드 - 요청 처리 목적이 아닌 일반 메소드 목적!)
	// => Spring의 Controller 메소드가 반드시 요청을 처리하는 메소드로 이루어져야 하는 건 아님!
	public String saveFile(MultipartFile upfile, HttpSession session) {

		// 파일명 수정 작업 후 서버에 업로드시키기
		// 예) "flower.png" => "2022112210405012345.png"
		// 1. 원본파일명 뽑아오기
		String originName = upfile.getOriginalFilename(); // "flower.png"

		// 2. 시간 형식을 문자열로 뽑아내기
		String currentTime = new SimpleDateFormat("yyyyMMddHHmmss").format(new Date()); // "2022112210405012345.png"

		// 3. 뒤에 붙을 5자리 랜덤값 뽑기
		int ranNum = (int)(Math.random() * 90000) + 10000; // 5자리 랜덤값

		// 4. 원본 파일로부터 확장자만 뽑기
		// String ext = originName.substring(마지막 .의위치);
		String ext = originName.substring(originName.lastIndexOf(".")); // ".png"

		// 5. 모두 이어 붙이기
		String changeName = currentTime + ranNum + ext;

		// 6. 업로드 하고자 하는 서버의 물리적인 실제 경로 알아내기
		String savePath = session.getServletContext().getRealPath("/resources/uploadFiles/");

		// 7. 경로와 수정 파일명을 합체 후 파일을 업로드 해 주기
		try {
			upfile.transferTo(new File(savePath + changeName)); // File의 매개변수로 경로를 지정해 주면 File이 만들어지면서 경로로 들어감
		} catch (IllegalStateException | IOException e) {
			e.printStackTrace();
		}

		return changeName;

	}
💻 BoardServiceImpl
	@Override
	public int insertBoard(Board b) {
		return boardDao.insertBoard(sqlSession, b);
	}
💻 BoardDao
	public int insertBoard(SqlSessionTemplate sqlSession, Board b) {

		return sqlSession.insert("boardMapper.insertBoard", b);

	}
💻 board-mapper.xml
	<insert id="insertBoard" parameterType="board">
		INSERT INTO BOARD (BOARD_NO
						 , BOARD_TITLE
						 , BOARD_WRITER
						 , BOARD_CONTENT
						 , ORIGIN_NAME
						 , CHANGE_NAME)
				   VALUES (SEQ_BNO.NEXTVAL
				   		 , #{boardTitle}
				   		 , #{boardWriter}
				   		 , #{boardContent}
				   		 , #{originName}
				   		 , #{changeName})
	</insert>
📍 여기서, 게시글 작성하고 등록하기 눌렀더니 왜 404가 뜨는 것인가?
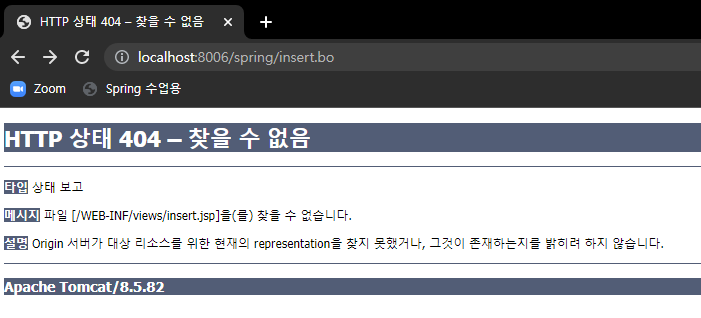
👉🏻 ModelAndView 세팅 시 DispatcherServlet에게 넘겨주지 않았기 때문에 응답 페이지 정보를 알려 주지 않은 꼴이 됨!
💻 BoardController insertBoard의 반환형, return 바꿔 주기
👉🏻 반환형 void에서 ModelAndView
👉🏻 return 구문 mv 추가
	@RequestMapping("insert.bo")
	public ModelAndView insertBoard(Board b, MultipartFile upfile, HttpSession session, ModelAndView mv) {

			String changeName = saveFile(upfile, session);

			// 8. 원본명, 서버에 업로드된 수정명을 Board b에 담기
			// => boardTitle, boardContent, boardWriter 필드에만 담겨 있음
			// => originName, changeName 필드에도 전달된 파일에 대한 정보를 담을 것임!
			b.setOriginName(upfile.getOriginalFilename());
			b.setChangeName("resources/uploadFiles/" + changeName); // 실제 경로도 같이 이어붙일 것(FILE_PATH 컬럼을 따로 빼두지 않음)

		}

		// 넘어온 첨부파일이 있을 경우 b: 제목, 작성자, 내용, 원본파일명, 경로 + 수정파일명
		// 넘어온 첨부파일이 없을 경우 b: 제목, 작성자, 내용
		int result = boardService.insertBoard(b);

		if(result > 0) { // 성공 => 게시글 리스트 페이지로 url 재요청(list.bo)

			session.setAttribute("alertMsg", "성공적으로 게시글이 등록되었습니다.");
			mv.setViewName("redirect:/list.bo");

		} else { // 실패 => 에러페이지로 포워딩

			// mv.addObject("errorMsg", "게시글 작성 실패");
			// mv.setViewName("common/errorPage");

			// addObject 메소드의 반환형은 ModelAndView 타입임
			// => 다음과 같이 메소드 체이닝 가능함
			mv.addObject("errorMsg", "게시글 작성 실패").setViewName("common/errorPage");
		}

		return mv;

	}

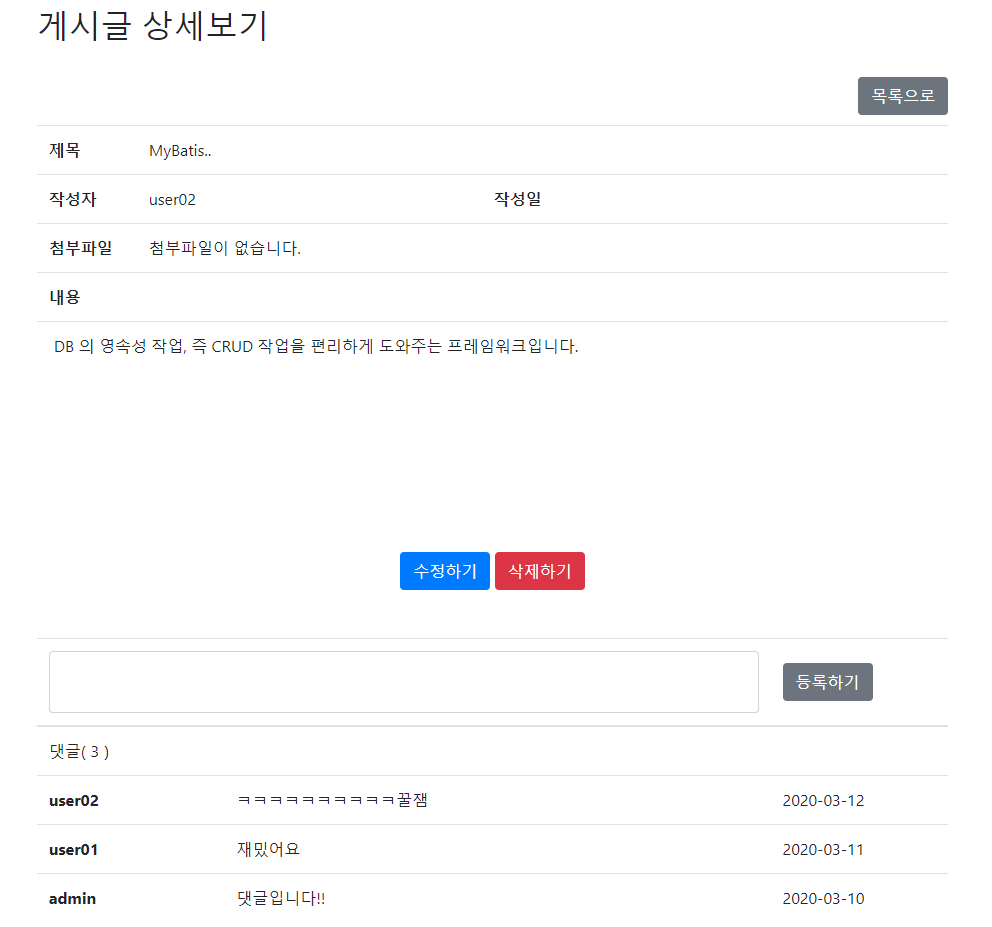
👉🏻 잘 들어감!
🔥 게시글 상세 조회/조회 수 증가 공통 🔥
💻 boardListView.jsp
👉🏻 script로 이벤트를 추가하여 게시글을 클릭했을 때 해당 게시글 번호의 url로 변동되게끔 함
👉🏻 table 태그에 대한 변동은 없으나 수정된 script 태그의 위치 파악을 위해 추가함!
<table id="boardList" class="table table-hover" align="center">
                <thead>
                    <tr>
                        <th>글번호</th>
                        <th>제목</th>
                        <th>작성자</th>
                        <th>조회수</th>
                        <th>작성일</th>
                        <th>첨부파일</th>
                    </tr>
                </thead>
                <tbody>
                	<c:forEach var="b" items="${ list }">
	                    <tr>
	                        <td>${ b.boardNo }</td>
	                        <td>${ b.boardTitle }<td>
	                        <td>${ b.boardWriter }</td>
	                        <td>${ b.count }</td>
	                        <td>${ b.createDate }</td>
	                        <td>
	                        	<c:if test="${ not empty b.originName }">
	                        		★
	                        	</c:if>
	                        </td>
	                    </tr>
	                </c:forEach>
                </tbody>
            </table>
            <br>

            <script>
            	$(function() {
            		$("#boardList>tbody>tr").click(function() {
            			location.href = "detail.bo?bno=" + $(this).children().eq(0).text();
            		});
            	});
            </script>
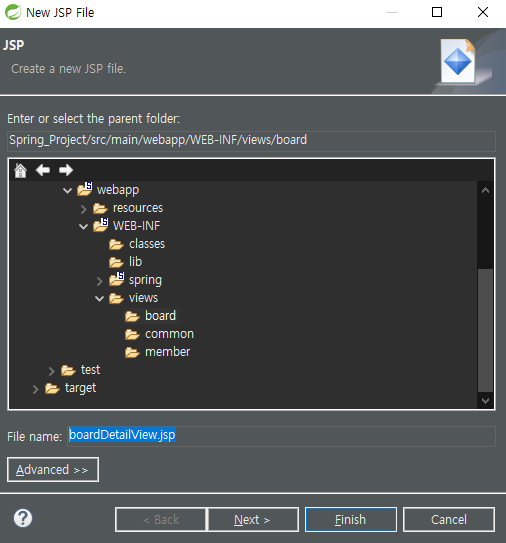
⌨️ BoardDetailView.jsp 생성 후 정적 코딩
👉🏻 만들어 놓은 폼에서 head 영역의 style(content와 innerOuter 제외), body 부분 복붙 하기
<%@ page language="java" contentType="text/html; charset=UTF-8"
    pageEncoding="UTF-8"%>
<%@ taglib prefix="c" uri="http://java.sun.com/jsp/jstl/core" %>
<!DOCTYPE html>
<html>
<head>
<meta charset="UTF-8">
<title>Insert title here</title>
    <style>
        table * {margin:5px;}
        table {width:100%;}
    </style>
</head>
<body>

    <jsp:include page="../common/header.jsp" />

    <div class="content">
        <br><br>
        <div class="innerOuter">
            <h2>게시글 상세보기</h2>
            <br>

            <a class="btn btn-secondary" style="float:right;" href="">목록으로</a>
            <br><br>

            <table id="contentArea" algin="center" class="table">
                <tr>
                    <th width="100">제목</th>
                    <td colspan="3">제목입니다요</td>
                </tr>
                <tr>
                    <th>작성자</th>
                    <td>admin</td>
                    <th>작성일</th>
                    <td>2020-02-07</td>
                </tr>
                <tr>
                    <th>첨부파일</th>
                    <td colspan="3">
                        <a href="" download="">파일명.jpg</a>
                    </td>
                </tr>
                <tr>
                    <th>내용</th>
                    <td colspan="3"></td>
                </tr>
                <tr>
                    <td colspan="4"><p style="height:150px;">게시판 내용이 들어갈 자리!!</p></td>
                </tr>
            </table>
            <br>

            <div align="center">
                <!-- 수정하기, 삭제하기 버튼은 이 글이 본인이 작성한 글일 경우에만 보여져야 함 -->
                <a class="btn btn-primary" href="">수정하기</a>
                <a class="btn btn-danger" href="">삭제하기</a>
            </div>
            <br><br>

            <!-- 댓글 기능은 나중에 ajax 배우고 나서 구현할 예정! 우선은 화면구현만 해놓음 -->
            <table id="replyArea" class="table" align="center">
                <thead>
                    <tr>
                        <th colspan="2">
                            <textarea class="form-control" name="" id="content" cols="55" rows="2" style="resize:none; width:100%;"></textarea>
                        </th>
                        <th style="vertical-align:middle"><button class="btn btn-secondary">등록하기</button></th>
                    </tr>
                    <tr>
                        <td colspan="3">댓글(<span id="rcount">3</span>)</td>
                    </tr>
                </thead>
                <tbody>
                    <tr>
                        <th>user02</th>
                        <td>ㅋㅋㅋㅋㅋㅋㅋㅋㅋㅋ꿀잼</td>
                        <td>2020-03-12</td>
                    </tr>
                    <tr>
                        <th>user01</th>
                        <td>재밌어요</td>
                        <td>2020-03-11</td>
                    </tr>
                    <tr>
                        <th>admin</th>
                        <td>댓글입니다!!</td>
                        <td>2020-03-10</td>
                    </tr>
                </tbody>
            </table>
        </div>
        <br><br>

    </div>

    <jsp:include page="../common/footer.jsp" />

</body>
</html>
🔥 조회 수 증가 기능 🔥
💻 BoardController
👉🏻 조회 수가 성공적으로 증가했다면 상세조회를 할 것
👉🏻 조회 수 증가가 먼저이므로 해당 기능 먼저 DB와 연결함
	@RequestMapping("detail.bo")
	public String selectBoard(int bno) {

		// bno에는 상세 조회하고자 하는 해당 게시글 번호가 담겨 있음

		// 1. 해당 게시글 조회 수 증가용 서비스 먼저 호출 결과 받기(update 하고 오기)
		int result = boardService.increaseCount(bno);

		if(result > 0) { // 성공적으로 조회 수 증가가 일어났다면

			// 2. 상세 조회 요청

		} else { // 조회 수 증가가 일어나지 않음 => 실패

		}

		return "board/boardDetailView";

	}
💻 BoardServiceImpl
	@Override
	public int increaseCount(int boardNo) {
		return boardDao.increaseCount(sqlSession, boardNo);
	}
💻 BoardDao
	public int increaseCount(SqlSessionTemplate sqlSession, int boardNo) {

		return sqlSession.update("boardMapper.increaseCount", boardNo);

	}
💻 board-mapper.xml
	<update id="increaseCount" parameterType="_int">
		UPDATE BOARD
		   SET COUNT = COUNT + 1
	    WHERE BOARD_NO = #{boardNo}
	   	  AND STATUS = 'Y'
	</update>
🔥 게시글 상세 조회 기능 🔥
💻 BoardController
	@RequestMapping("detail.bo")
	public ModelAndView selectBoard(int bno, ModelAndView mv) {

		// bno에는 상세 조회하고자 하는 해당 게시글 번호가 담겨 있음

		// 1. 해당 게시글 조회 수 증가용 서비스 먼저 호출 결과 받기(update 하고 오기)
		int result = boardService.increaseCount(bno);

		if(result > 0) { // 성공적으로 조회 수 증가가 일어났다면

			// 2. 상세 조회 요청
			// => boardDetailView.jsp 상에 필요한 데이터
			Board b = boardService.selectBoard(bno);

			// 조회된 데이터를 담아서 board/boardDetailView.jsp로 포워딩
			mv.addObject("b", b).setViewName("board/boardDetailView");

		} else { // 조회 수 증가가 일어나지 않음 => 실패

			mv.addObject("errorMsg", "게시글 상세 조회 실패").setViewName("common/errorPage");

		}

		return mv;

	}
💻 BoardServiceImpl
	@Override
	public Board selectBoard(int boardNo) {
		return boardDao.selectBoard(sqlSession, boardNo);
	}
💻 BoardDao
	public Board selectBoard(SqlSessionTemplate sqlSession, int boardNo) {

		return sqlSession.selectOne("boardMapper.selectBoard", boardNo);

	}
💻 board-mapper.xml
👉🏻 게시글 전체 조회 시 사용했던 boardResultSet에 content와 changeName을 추가하여 재활용!
	<resultMap id="boardResultSet" type="board">
		<result column="BOARD_NO" property="boardNo" />
		<result column="BOARD_TITLE" property="boardTitle" />
		<result column="BOARD_WRITER" property="boardWriter" />
		<result column="COUNT" property="count" />
		<result column="CREATE_DATE" property="createDate" />
		<result column="ORIGIN_NAME" property="originName" />

		<result column="BOARD_CONTENT" property="boardContent" />
		<result column="CHANGE_NAME" property="changeName" />
	</resultMap>

    	<select id="selectBoard" parameterType="_int" resultMap="boardResultSet">
		SELECT BOARD_NO
			 , BOARD_TITLE
			 , BOARD_WRITER
			 , TO_CHAR(CREATE_DATE, 'YYYY-MM-DD')
			 , BOARD_CONTENT
			 , ORIGIN_NAME
			 , CHANGE_NAME
		FROM BOARD
		WHERE BOARD_NO = #{boardNo}
	</select>
💻 boardDetailView
👉🏻 getter 채워 주기, 첨부파일 유무 조건 걸기
👉🏻 목록으로 부분에 list로 돌아갈 수 있게끔 링크 걸기
👉🏻 해당 table, 목록으로 a 태그에만 수정이 일어났으므로 전체 코드 없이 수정된 부분만 발췌함!
            <a class="btn btn-secondary" style="float:right;" href="list.bo">목록으로</a>
            <br><br>

            <table id="contentArea" algin="center" class="table">
                <tr>
                    <th width="100">제목</th>
                    <!-- 여기서 잘못 넣어 주면 getter 오류 남! -->
                    <td colspan="3">${ b.boardTitle }</td>
                </tr>
                <tr>
                    <th>작성자</th>
                    <td>${ b.boardWriter }</td>
                    <th>작성일</th>
                    <td>${ b.createDate }</td>
                </tr>
                <tr>
                    <th>첨부파일</th>
                    <td colspan="3">
                    	<c:choose>
                    		<c:when test="${ empty b.originName }">
                    			첨부파일이 없습니다.
                    		</c:when>
                    		<c:otherwise>
                    			<!-- 그냥 download로만 적어도 다운로드는 가능하지만, 그렇게 되면 수정명으로 파일 다운로드되므로 원본 파일명으로 처리해 줄 것! -->
                        		<a href="${ b.changeName }" download="${ b.originName }">${ b.originName }</a>
                    		</c:otherwise>
                    	</c:choose>
                    </td>
                </tr>
                <tr>
                    <th>내용</th>
                    <td colspan="3"></td>
                </tr>
                <tr>
                    <td colspan="4"><p style="height:150px;">${ b.boardContent }</p></td>
                </tr>
</table>👉🏻 이제 게시판 글을 누르면
👉🏻 Tara~ 상세보기가 가능해짐!