![[Java] 10_기본 API(Math, StringPool, StringMethod, StringTokenizer, Wrapper-parsing, Date)](https://img1.daumcdn.net/thumb/R750x0/?scode=mtistory2&fname=https%3A%2F%2Fblog.kakaocdn.net%2Fdn%2FdNFK21%2FbtrJqrGKJ5T%2FKK7wY297Iw6QT2K9Qpcf2k%2Fimg.png)
10_기본 API
API: Application Programming Interface
(== 라이브러리, 개발에 자주 사용되는 인터페이스의 모음)
Math 클래스 테스트
package com.kh.chap01.math.run;

// import java.lang.Math
// 왜 얘를 import 안 해도 Math.PI가 실행되는 걸까?
// => import java.lang.*;
// => 생략 가능! 보이진 않지만 항상 import가 되어 있음

// java.lang.Math 클래스 테스트
public class MathRun {

	public static void main(String[] args) {

		// Math 클래스 (수학과 관련) 에서 제공하고 있는 유용한 기능들에 대해서 살펴보자!

		// Math math = new Math();
		// Math 클래스는 모든 필드가 상수 필드이고, 모든 메소드가 static 메소드이기 때문에
		// 객체를 생성해서 불러올 필요가 없음 => 생성자도 private이라 생성 구문 자체를 사용하지 않음!

		// 1. 파이: 원주율(3.14...)
		// 			Math 클래스 내에 상수 필드로 정의되어 있음
		System.out.println("파이: " + Math.PI); // 컨트롤 누르고 클릭해 보면 클래스를 확인해 볼 수 있음, 파이: 3.141592653589793

		// 자주 쓰이는 메소드들
		// 메소드명(매개변수): 반환형
		// 1. 올림 => Math.ceil(double): 반환값 double형
		double num1 = 4.349;
		System.out.println("올림: " + Math.ceil(num1)); // 올림: 5.0

		// 2. 반올림 => Math.round(double): 반환값 long형
		System.out.println("반올림: " + Math.round(num1)); // 반올림: 4

		// 3. 버림 => Math.floor(double): 반환값 double형
		System.out.println("버림: " + Math.floor(num1)); // 버림: 4.0

		// 4. 절대값 => Math.abs(int/double/long/float): 반환값 int/double/long/float 그대로
		int num2 = -10;
		System.out.println("절대값: " + Math.abs(num2)); // 절대값: 10

		// 5. 최소값 = > Math.min(int, int): 반환값 int형
		System.out.println("최소값: " + Math.min(5, 10)); // 최소값: 5

		// 6. 최대값 => Math.max(int, int): 반환값 int형
		System.out.println("최대값: " + Math.max(5, 10)); // 최대값: 10

		// 7. 제곱근(루트) => Math.sqrt(double): 반환형 double형
		System.out.println("제곱근: " + Math.sqrt(4)); // 제곱근: 2.0

		// 8. 제곱 => Math.pow(double, double): 반환값 double형
		System.out.println("2의 10제곱: " + Math.pow(2,  10)); // 2의 10제곱: 1024.0

		// 9. 랜덤 => Math.random(): 반환값 double형
		//							0.0 ~ 0.999999...
		System.out.println("랜덤수: " + Math.random());

		/*
		 * java.lang.Math 클래스의 특징
		 * - 모든 필드: 상수 필드
		 * - 모든 메소드: static 메소드
		 *
		 * 모든 게 다 static이기 때문에 Math.으로 접근 가능 (객체 생성이 필요 없었음)
		 * Math 클래스의 생성자가 private이다 (애초에 생성 불가)
		 *
		 * static: 프로그램 시작과 동시에 메모리 영역에 올려두고 공유하며 재사용하는 개념
		 * => 싱글톤 패턴
		 */

	}

}
jdk 개발자 문서(참고 사이트)
클래스의 용도와 메소드, 매개변수, 반환형 등에 대한 정보를 한눈에!
https://docs.oracle.com/javase/8/docs/api/index.html
Java Platform SE 8
docs.oracle.com
A_StringPoolTest 클래스
package com.kh.chap02.string.controller;

//String의 특성
public class A_StringPoolTest {

	// 1. 생성자를 통해서 String 변수에 문자열 담기
	public void method1() {
		String str1 = new String("hello");
		String str2 = new String("hello");

		System.out.println(str1 /* .toSrtring */); // 주소값
		System.out.println(str2);
		// => String 클래스에 toString 메소드가 실제 담긴 내용물을 출력할 수 있도록 오버라이딩 되어 있음

		System.out.println(str1.hashCode()); // 99162322
		System.out.println(str2.hashCode()); // 99162322 왜 같지??
		// => String 클래스에 hashCode 메소드가 실제 담긴 내용물을 기반으로 십진수로 변경해서 리턴할 수 있도록 오버라이딩 되어 있음

		// 정말 주소값에 대해 알고 싶다면
		// System.identityHashCode(객체명);
		System.out.println(System.identityHashCode(str1)); // 1829164700
		System.out.println(System.identityHashCode(str2)); // 2018699554
		// str1과 str2의 주소값은 다르다

		// 문자열 비교
		System.out.println(str1 == str2); // == 으로 비교할 때는 주소값 비교, false

		System.out.println(str1.equals(str2)); // true
		// => 원래 Object 클래스에서 제공하는 equals 메소드는 주소값이 일치하는지 비교하는 메소드
		// => String 클래스의 equals는 내용물 동등 비교를 할 수 있도록

	}

	// 2. 문자열을 리터럴로 생성
	public void method2() {
		String str1 = "hello";
		String str2 = "hello";

		System.out.println(str1); // hello
		System.out.println(str2); // hello

		System.out.println(str1.hashCode()); // 99162322
		System.out.println(str2.hashCode()); // 99162322

		System.out.println(System.identityHashCode(str1)); // 1829164700
		System.out.println(System.identityHashCode(str2)); // 1829164700

		System.out.println(str1 == str2); // 주소값 비교
		// => 진짜 주소값이 같나...?

		// 문자열을 생성할 때 생성자를 통해서 만드는 방법
		// : 매번 생성되는 내용물이 같더라도 서로 다른 공간에 각각 생성됨
		// 리터럴을 제시해서 만드는 방
		// : 매번 생성되는 내용물이 Heap 영역 안에 StringPool(상수풀)에 생성됨
		// => StringPool 공간의 특징: 동일한 문자열이 존재 불가

	}
}
// 불변클래스(변하지 않는 클래스)
}
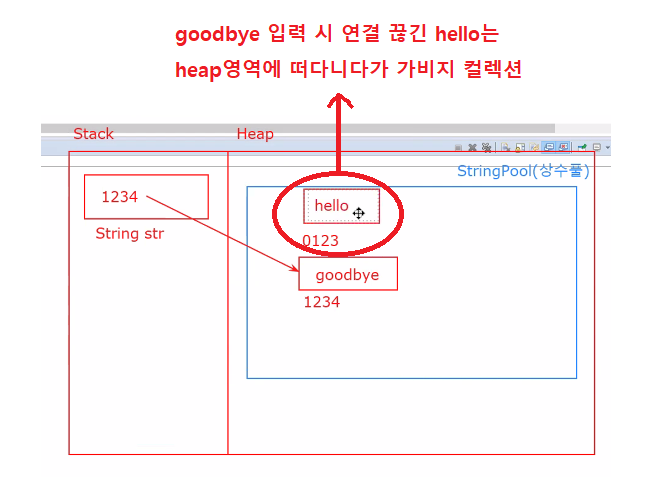
public void method3() {
String str = "hello";
System.out.println(System.identityHashCode(str)); // 1829164700
str = "goodbye";
System.out.println(System.identityHashCode(str)); // 2018699554
}
str += "abc"; //str = str + "abc";
		System.out.println(System.identityHashCode(str)); // 1311053135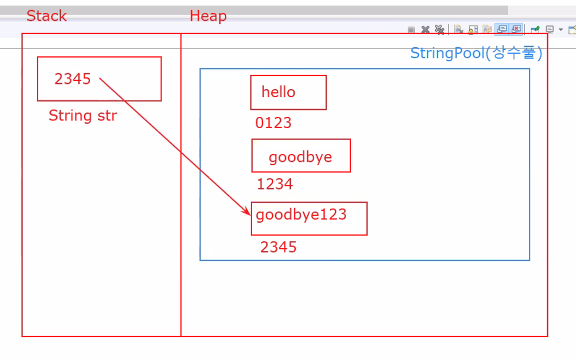
String 객체는 한번 생성되면 메모리 공간의 내용물이 변하지 않음
=> 불변 클래스라고 부름
기존의 상수풀의 연결이 끊긴 문자열들은 가비지 콜렉터가 알아서 정리해 줌
불변클래스라고 해서 내용물이 수정되는 게 아니라 매번 새로운 주소값을 참조함
B_StringMethodTest 클래스
package com.kh.chap02.string.controller;

import java.util.Arrays;
import java.util.Scanner;

public class B_StringMethodTest {

	public void method1() {

		String str1 = "Hell world";

		// 메소드명(매개변수): 반환형

		// 1. 문자열.charAt(int indec): 반환값 char형
		// => 문자열에서 전달받은 index 위치의 문자 하나만 뽑아서 리턴
		char ch = str1.charAt(3);
		System.out.println("ch: " + ch); // ch: l

		// 2. 문자열.concat(String str): 반환값 String형
		// => 문자열과 전달된 또 다른 문자열을 하나로 연이어서 리턴
		String str2 = str1.concat("!!!"); // String str2 = str1 + "!!!";
		System.out.println("str2: " + str2); // str2: Hell world!!!

		// 3. 문자열 .length(): 반환형 int형
		// => 문자열의 길이 반환
		System.out.println("str1의 길이: " + str1.length()); // str1의 길이: 10

		// 4_1. 문자열.subString(int beginIndex): 반환값 String형
		// => 문자열의 beginIndex 위치에서부터 끝까지의 문자열을 추출해서 리턴
		System.out.println(str1.substring(6)); // orld

		// 4_2. 문자열.subString(int beginIndex, int endIndex): 반환값 String형
		// => 문자열의 beginIndex 위치에서부터 endInex - 1 위치까지 추출해서 리턴
		System.out.println(str1.substring(0, 6)); // 0 <= 인덱스범위 < 6, Hell w


		// 5. 문자열.replace(char old, char new): 반환값 String형
		// => 문자열로부터 old 문자를 new 문자로 변환한 문자열을 리턴
		String str3 = str1.replace('l', 'c');
		System.out.println("str3: " + str3); // str3: Hecc worcd

		// 6. 문자열.trim(): 반환할 Stirng형
		// => 문자열의 앞, 뒤 공백을 모두 제거한 문자열을 티런
		String str4 = "      JA         VA       ";
		System.out.println("trim(): " + str4.trim()); // trim(): JA         VA, 문자 사이 중간 공백은 없어지지 않음!

		// 참고) 중간에 있는 공백을 없애고 싶다면?
		// replace 메소드를 활용해 보자!
		System.out.println("replace를 활용해서 가운데 공백도 없애기: " + str4.replace(" ", "")); // replace를 활용해서 가운데 공백도 없애기: JAVA

		// 7_1. 문자열.toUpperCase(): 반환값 String형
		// => 문자열을 모두 다 대문자로 변경 후 문자열 리턴
		System.out.println("upper: " + str1.toUpperCase()); // upper: HELL WORLD

		// 7_2. 문자열.toLowerCase(): 반환값 String형
		// => 문자열을 모두 다 소문자로 변경 후 문자열 리턴
		System.out.println("lower: " + str1.toLowerCase()); // lower: hell world

		/*
		// 활용 예시
		Scanner sc = new Scanner(System.in);

		System.out.print("종료하시겠습니까? (y/n): ");
		// char answer = sc.nextLine().charAt(0); // Y, y, N, n
		char answer = sc.nextLine().toUpperCase().charAt(0); // Y, N으로 경우가 좁혀짐!
		// => 메소드를 연이어서 호출(메소드체이닝)

		if(answer == 'Y') {
			System.out.println("프로그램을 종료합니다.");
		} else {
			System.out.println("프로그램을 종료하지 않습니다.");
		}
		*/


		// 문자열 => char[]
		/*
		char[] arr = new char[str1.length()];

		for(int i = 0; i < arr.lengh; i++) {
			arr[i] = str1.charAt(i);
		}
		*/

		// 8. 문자열.toCharArray(): 결과값 char[]형
		// => 문자열의 각 문자들을 char[] 배열로 옮겨 담은 후 그 배열을 리턴
		char[] arr = str1.toCharArray();
		System.out.println(Arrays.toString(arr)); // [H, e, l, l,  , w, o, r, l, d]


		// char[] => 문자열
		char[] arr2 = {'a', 'p', 'p', 'l', 'e'};

		// 9. String.valueOf(char[] data): 변환값 String형
		// => 전달된 char[] 배열에 담긴 문자들을 하나의 문자열로 연이어서 리턴
		System.out.println(String.valueOf(arr2)); // apple


	}

}
C_StringTokenizerTest 클래스
package com.kh.chap02.string.controller;
import java.util.StringTokenizer;
public class C_StringTokenizerTest {
public void method() {
// 문자열을 분리시키는 방법
String str = "Java,Oracle,JDBC,HTML,Server,Spring";
// 구분자를 제시해서 해당 문자열을 분리시키는 방법
// 방법1. 분리된 문자열들을 String[] 배열에 차곡차곡 관리하고자 할 때
// 문자열.split(String 구분자): 반환값 String[]형
String[] arr = str.split(",");
/*
for(int i = 0; i < arr.length; i++) {
System.out.println(arr[i]);
}
*/
// 문자열 배열의 경우 for문을 이런 식으로도 쓸 수 있음 (향상된 for문, foreach문)
// for(값을받아줄수있는변수선언문 : 순차적으로접근할배열또는컬렉션명)
for(String s : arr) {
System.out.println(s);
}
System.out.println("====================");
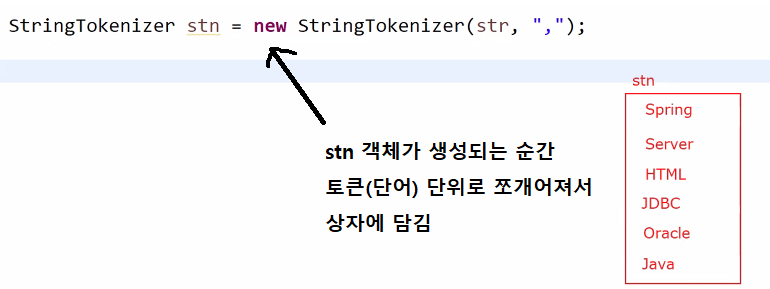
// 방법2. 분리된 각각의 문자열들을 "토큰"(단어) 단위로 취급하고 싶을 때
// java.util.StringTokenizer 클래스를 이용하는 방법
// StringTokenizer stn = new StringTokenizer(분리시키고자하는문자열, 구분자);
StringTokenizer stn = new StringTokenizer(str, ",");
}
}
System.out.println("분리된 문자열의 갯수: " + stn.countTokens()); // 분리된 문자열의 갯수: 6

			/*
			// 출력
			System.out.println(stn.nextToken()); // Java
			// 이 시점에서 토큰의 개수는 5임
			System.out.println(stn.countTokens()); // 5
			System.out.println(stn.nextToken()); // Oracle
			System.out.println(stn.nextToken()); // JDBC
			System.out.println(stn.nextToken()); // HTML
			System.out.println(stn.nextToken()); // Server
			System.out.println(stn.nextToken()); // Spring

			System.out.println(stn.nextToken());
			// NoSuchElementException: 더 이상 찾을 요소가 없음
			// => 현재 남아 있는 stn 토큰 개수의 범위를 벗어났을 때 발생하는 오류
			*/

			// 반복문 활용
			for(int i = 0; i < stn.countTokens(); i++) {
				System.out.println(stn.nextToken());
			}

			/* 반복문에서 무슨 일이 있었을까?
			 *  i = 0, 토큰 개수 6개 => true => Java 출력 => i++
			 *  i = 1, 토큰 개수 5개 => true => Oracle 출력 => i++
			 *  i = 2, 토큰 개수 4개 => true => JDBC 출력 => i++
			 *  i = 3, 토큰 개수 3개 => false => 반복문 끝!
			 */


			// 해결방법1. 변수 활용
			/*
			int count = stn.countTokens(); // 처음 토큰의 개수를 변수화시켜서 고정시켜 놓음

			for(int i = 0; i < count; i++) {
				System.out.println(stn.nextToken());
			}
			*/

			// 해결방법2. while문 사용
			// stn.hasMoreTokens(): stn 객체에 더 이상 뽑아낼 토큰이 있다면 true, 아니라면 false로 반환
			while (stn.hasMoreTokens()) { // stn 공간에 남아 있는 토큰이 있을 동안에만 반복을 수행하겠다
				System.out.println(stn.nextToken());;
			}
* Wrapper 클래스
=> 기본 자료형을 객체 타입으로 포장해 주는 클래스들을 래퍼 클래스라고 함
기본 자료형 <---> Wrapper 클래스
boolean Boolean
char Character
byte Byte
short Short
int Integer
long Long
float Float
double Double
=> 기본 자료형을 객체로 취급해야 하는 경우
- 메소드 호출해야 할 때
- 메소드의 매개변수로 기본 자료형 값이 아닌 객체 타입만 요구될 때
- 다형성을 적용하고자 할 때
package com.kh.chap03.wrapper.run;

public class WrapperRun {

	// 래퍼 클래스
	public static void main(String[] args) {

		/*
		 * Wrapper 클래스
		 * => 기본 자료형을 객체 타입으로 포장해 주는 클래스들을 래퍼 클래스라고 함
		 *
		 * 		기본 자료형		<--->		Wrapper 클래스
		 * 		boolean						Boolean
		 * 		char						Character
		 * 		byte						Byte
		 * 		short						Short
		 * 		int							Integer
		 * 		long						Long
		 * 		float						Float
		 * 		double						Double
		 *
		 * => 기본 자료형을 객체로 취급해야 하는 경우
		 * - 메소드 호출해야 할 때
		 * - 메소드의 매개변수로 기본 자료형 값이 아닌 객체 타입만 요구될 때
		 * - 다형성을 적용하고자 할 때
		 */

		int num1 = 10;
		int num2 = 15;

		// 동등비교를 하고자 할 때
		// System.out.println(num1 == num2);
		// System.out.println(num1.equals(num2)); // int형 변수이기 때문에 사용할 수가 없어요

		// 일반 기본 자료형에서 객체 자료형의 메소드를 호출하고자 할 때 Wrapper 클래스로 변환해서 주로 사용

		// 기본 자료형 => Wrapper자료형(Boxing)

		// 1. 객체 생성 구문을 이용한 방법(생성자 호출)
		Integer i1 = new Integer(num1); // num1 => i1
		Integer i2 = new Integer(num2); // num2 => i2

		System.out.println(i1 /* .toString() */); // 10
		System.out.println(i2); // 15

		System.out.println(i1 == i2); // 주소값 비교 false
		System.out.println(i1.equals(i2)); // (숫자로써의) 내용 비교 false
		System.out.println(i1.hashCode()); // 10
		System.out.println(i1.compareTo(i2)); // -1
		// a.compareTo(b): a가 b보다 크면 1, b가 더 크면 -1, 동일하면 0 리턴
		// => 객체로 바꾸게 되면 메소드를 자유롭게 이용 가능함


		// 2. 객체를 생성하지 않고 곧바로 대입하는 방법(AutoBoxing)
		Integer i3 = 10;
		System.out.println(i3); // 10

		// 특이케이스. 객체 생성구문을 통해서 반드시 변환해야 하는 경우 => 문자열을 Integer로 바꾸는 경우
		// Integer i4 = "123";
		Integer i4 = new Integer("123"); // "123" => 123
		System.out.println(i4);

		// Wrapper 자료형 => 기본 자료형(UnBoxing)

		// 1. 해당 그 Wrapper 클래스에서 제공하는 xxxValue() 메소드를 활용하는 법
		int num3 = i3.intValue(); // i3 => num3 10
		int num4 = i4.intValue(); // i4 => num4 123

		System.out.println(num3 > num4); // false

		// 2. 메소드 따위를 사용하지 않고 바로 대입하는 방법 (Auto UnBoxing)
		int num5 = i1; // 10
		int num6 = i2; // 15

		System.out.println(i1 == i2); // false

		System.out.println("=====================");

		// 기본자료형값 <---> String
		String str1 = "10";
		String str2 = "15.3";

		System.out.println(str1 + str2); // "1015.3" => 숫자가 아닌 문자열로 출력됨

		// 1. String(== 문자열) --> 기본자료형: 파싱한다
		// 						    	        해당Wrapper클래스명.parseXXX(변환할문자형);
		int i = Integer.parseInt(str1); // "10" => 10
		double d = Double.parseDouble(str2); // "15.3" => 15.3

		System.out.println(i + d); // 25.3

		// 2. 기본자료형 --> String(== 문자열)
		// String.valueOf(변환할기본자료형값): String형
		String strI = String.valueOf(i); // 10 => "10"
		String strD = String.valueOf(d); // 15.3 => "15.3"

		System.out.println(strI + strD); // 1015.3

	}

}
DateRun 클래스